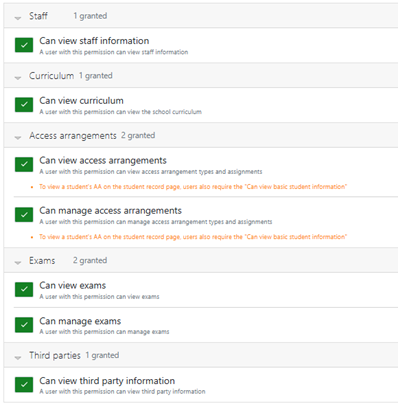
Permissions
To manage seating plans the following permissions are required:
Seating plans
Before seating plans can be created, rooms must be allocated to the exam session (Managing exam rooms).
Candidates can be seated individually, or in bulk.
From the relevant session, click on the Seating plans tab.
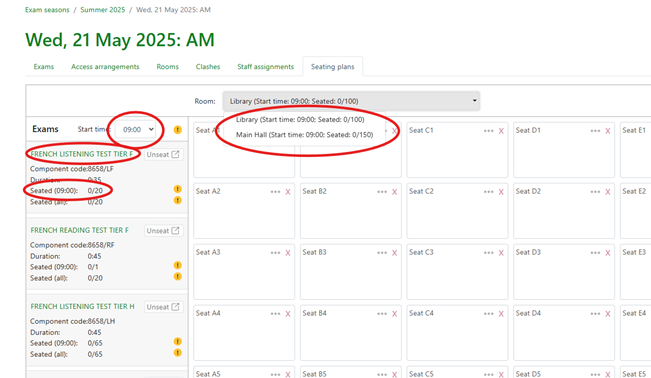
All exams timetabled for the current session will be shown on the left side of the screen, and the information will include the exam name, component code and duration. The start time is displayed at the top and will include all start times to cater for clashes where more than one exam is being taken in the same session. Exams can only be seated if there is a valid duration.
The number of candidates seated will also be displayed, together with a flag if there are still unseated candidates. Above the seats will be a list of rooms currently allocated to this exam session. To add more rooms, click on the Rooms tab and use the Assign exam rooms functionality.
Clicking on the exam name will display a list of all candidates who are scheduled to sit that exam at the displayed time.
Seating candidates individually
To seat candidates individually, e.g. to add EAA students into a separate/smaller room, select the room from the list to display the correct layout and the required start time (if relevant). Click on the exam name to show the list of students, click on the relevant student’s name and drag it across to the required seat.
Repeat this process, as required, selecting the relevant room(s) and candidate(s).
Candidates can also be moved between seats using the same drag and drop method.
Seating multiple candidates
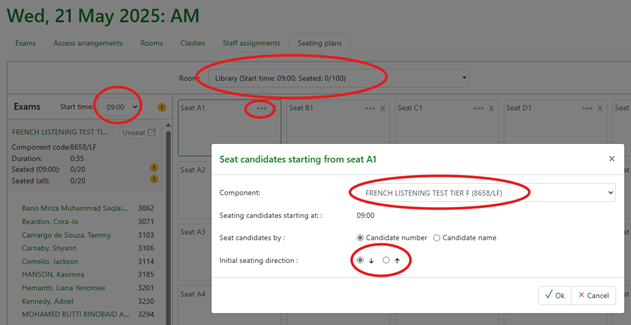
Candidates from the same exam in the same room can be seated in bulk. Select the required room, click on the ellipsis in the top corner of the seat you wish to start at and select Seat candidates. Select the component you wish to seat, the order in which you wish to seat the candidates (alphabetically or by candidate number) and the direction of the seating.
In the example below for French Listening (F), starting at seat A1 candidates will be seated in candidate number order and the seats will be filled in a snake pattern in the direction shown (A1-A10, B10-B1, etc.). Any candidates who have already been seated (either in the same or a different room) will not be included in this process.
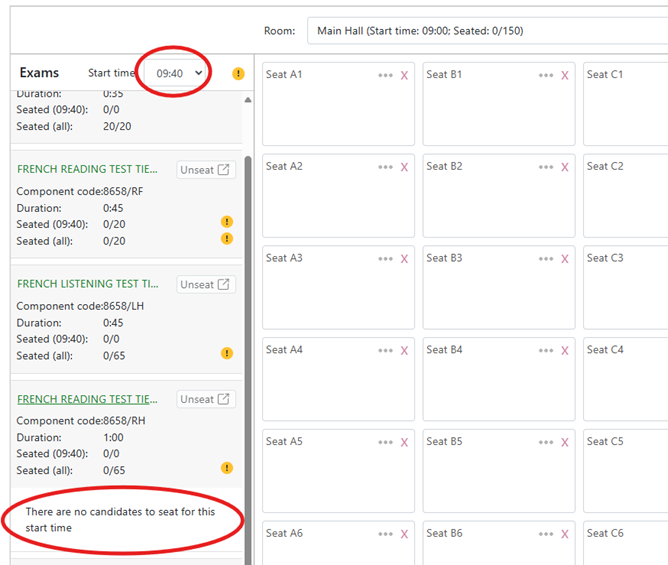
For sessions that have exams with different start times, candidates can only be seated for each exam when the correct start time is selected. In the example below the start time selected is 09:40, there are no candidates to seat for the Reading Higher exam as that is not the correct start time. The start time should be changed to 09:50, or the Listening exam should be selected.
Unseating candidates
Candidates can either be unseated individually or by exam. To unseat individual candidates, click on the little red cross on their seat.
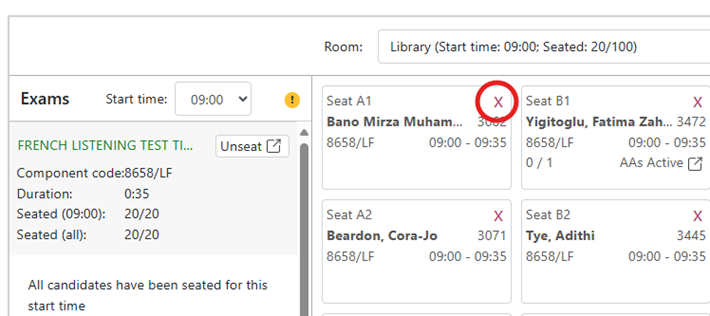
To unseat candidates by exam, click on the ‘Unseat’ option next to the exam name. A window will be displayed confirming which exam you are unseating, from which room and start time (if relevant) and the number of candidates affected. Click on OK to complete the process.
Deactivating seats
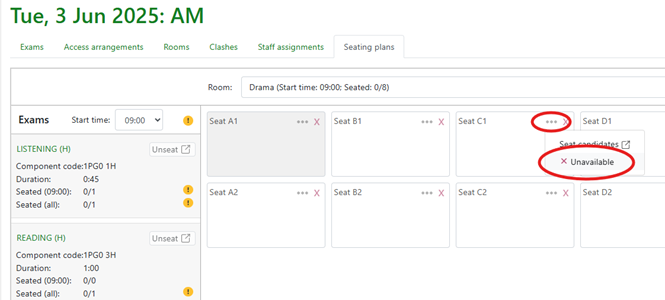
Seats can be set to unavailable for a session. From the Seating plans tab, select the relevant room, click on the ellipsis in the top corner of the relevant seat and select Unavailable. When set to unavailable, the seat will be shaded on the seating plan.
In the example below, seat A1 in the Drama Studio has been marked as unavailable. This will prevent candidates being seated there manually, and this seat will be skipped during the bulk seating process.
To make the seat available again, click on the ellipsis and select Available.
Seating plans can be printed by individual session or in bulk and include a desk layout with candidate details (name, candidate number, component code, start and finish time) and a report detailing all active access arrangements for each session and room.
Cloning seating plans
Seating plans can be copied from one exam to another within the same season. From the seating plan tab, click on Clone:
Follow the wizard to select the origin room, start time and exam you wish to copy. At step 4, search for the destination session by scrolling through the dates, or enter the exam subject or code in the Search box. Select the destination session, exam and candidates and click on Confirm. Repeat this process for all required exams/rooms.
Printing seating plans by session
To print for an individual session, from the Seating plan tab click on the Print option and select the required room(s) and start time(s). Using the options in the Print settings modal, select Seating plans and/or Access Arrangement reports, the preferred layout (Portrait/Landscape), page size and colour/black and white and click in Print. When the Access Arrangements report is unticked, students with Access Arrangements will not be flagged so the seating plan can be used for display purposes.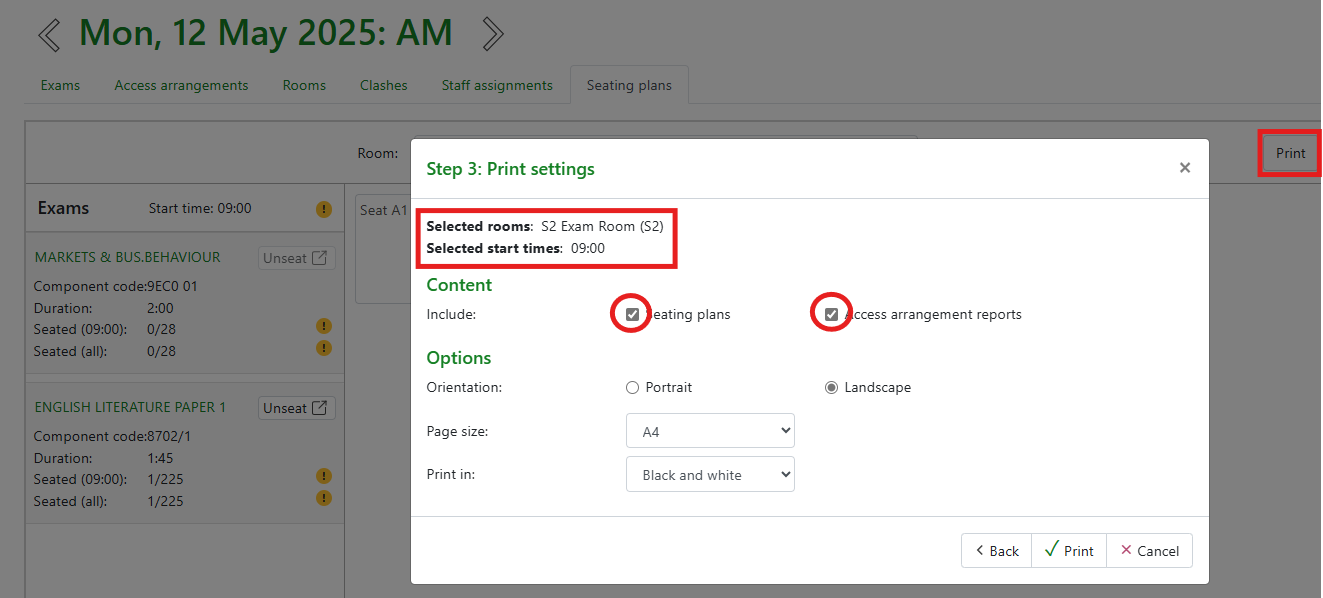
Printing seating plans and registers in bulk
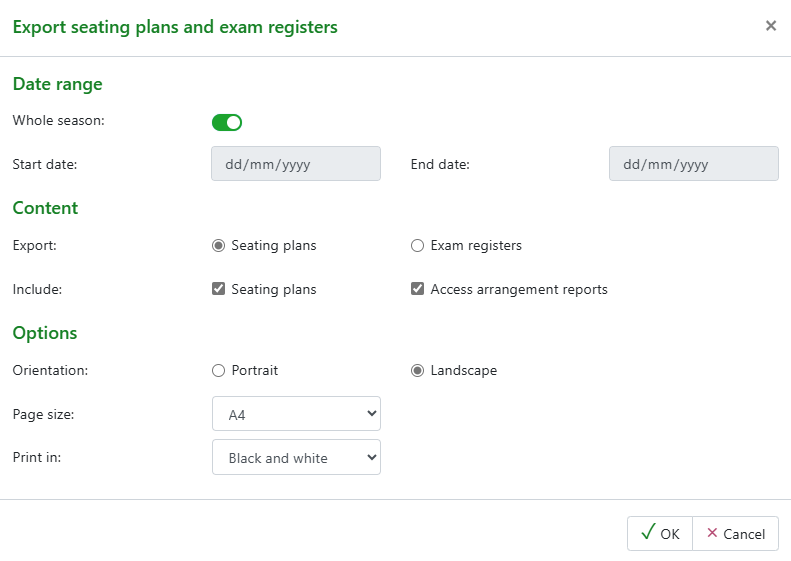
Seating plans and registers can also be printed in bulk. From the Schedule tab, click on the Export option and select Export seating plans and exam registers. When printing Seating plans, you can select seating plans and/or Access Arrangement reports. When the Access Arrangements report is unticked, students with Access Arrangements will not be flagged so the seating plan can be used for display purposes. When printing Registers, you can select to order candidates by name or number. Use the date picker or Whole season toggle to select the relevant dates and click on OK.